Showing posts with label decor. Show all posts

...wedding reception: how we brought the outdoors inside...

In case you need to catch up...we talked about settling on our reception venue  here, here, and here.

All along, DG and I really loved the idea of an outdoor reception, but we did NOT love the risk.  Considering the 500-year flood happened ON OUR WEDDING DAY…we are really glad we came up with this lovely plan B. In the end...though we were  inside and still dry...we still achieved the feel of a late-night outdoor dinner party...or something.  (Yard games and all.)

We basically dreamed up this space in our heads, called in  A LOT of favors, lit the place up and got what you’ll see here.  Let’s start at the beginning….

This is what the arena at Belmont’s Curb Event Center looks like on a normal day.


And here’s an average dinner setup.


And here’s what we did...

Day one of setup was mostly just building the space. The floor was covered and the frame of truss to hang the curtain was flown.  Lighting and sound were hung...you know...normal wedding stuff. :)


I wish I had been more diligent about taking pictures of the progression because, well, Mom's photography....not that great.  (Sorry Mom! But it's true!)  But maybe you'll get the idea...

Here the curtain is being tied on to the frame, but we haven't flown it yet.  


Dad's working hard on putting our lanterns together...looking thrilled to be doing so.  (We'll get to exactly how we made them in a post coming soon!)


Here Dad and I are working on making four GIANT pseudo-lanterns out of these 55-gallon oil drums.  We're pretty hardcore if you haven't noticed.  (Also, this was pretty much my standard uniform for that entire week. Yoga pants all the way.)


In this one you can see we've hung everything where it belongs and our lanterns are suspended over an empty room...


Soon we put the brother and sisters-in-law to work covering our tables in kraft paper.  We owe them big.  They were awesome!


Obviously there are a lot of details that I'll show you in coming posts...but here's the basic finished product!! It was a lot of work, but oh-so worth it!  Will is one talented guy, but I really just don't think a photo can do it justice.


More details to come!  Big thanks to Will at Will Knowles Weddings for all the real pictures!

...wedding reception: our grand entrance...

And the World’s Worst Blogger Award goes to…

Eh, never mind all that.  Here’s the truth of the matter: Enough for Ever After has been sadly neglected as I’m busying myself with actually living the Ever After.  And I think it’s time to face facts.  I am not that girl who had a wedding and fell in love with having a wedding and would love to keep talking about her wedding.  Don’t get me wrong.  It was great.  I was proud of it.  We worked hard and it paid off because our wedding was A-list in my book and I loved every last detail.  That being said, by the time we got to our wedding I was sick of it and ready to put it away.  I am ready to put it away even now, but I still owe all of you patient readers the second half of the story.

So here’s the deal.  I’m going to do my darndest to push through the reception recaps, share all the helpful info that I can, and then I’m going to say goodbye.  I’ll leave this little blog hanging out here in Cyberland for a while in hopes that some of those ladies who will be planning future Nashville weddings, or any wedding for that matter, might find a little something that can help her along the way.  We’ve still got a ways to go, so don’t get all misty-eyed on me….but I just wanted you to know where this is headed.

Anyway, back to the reception….

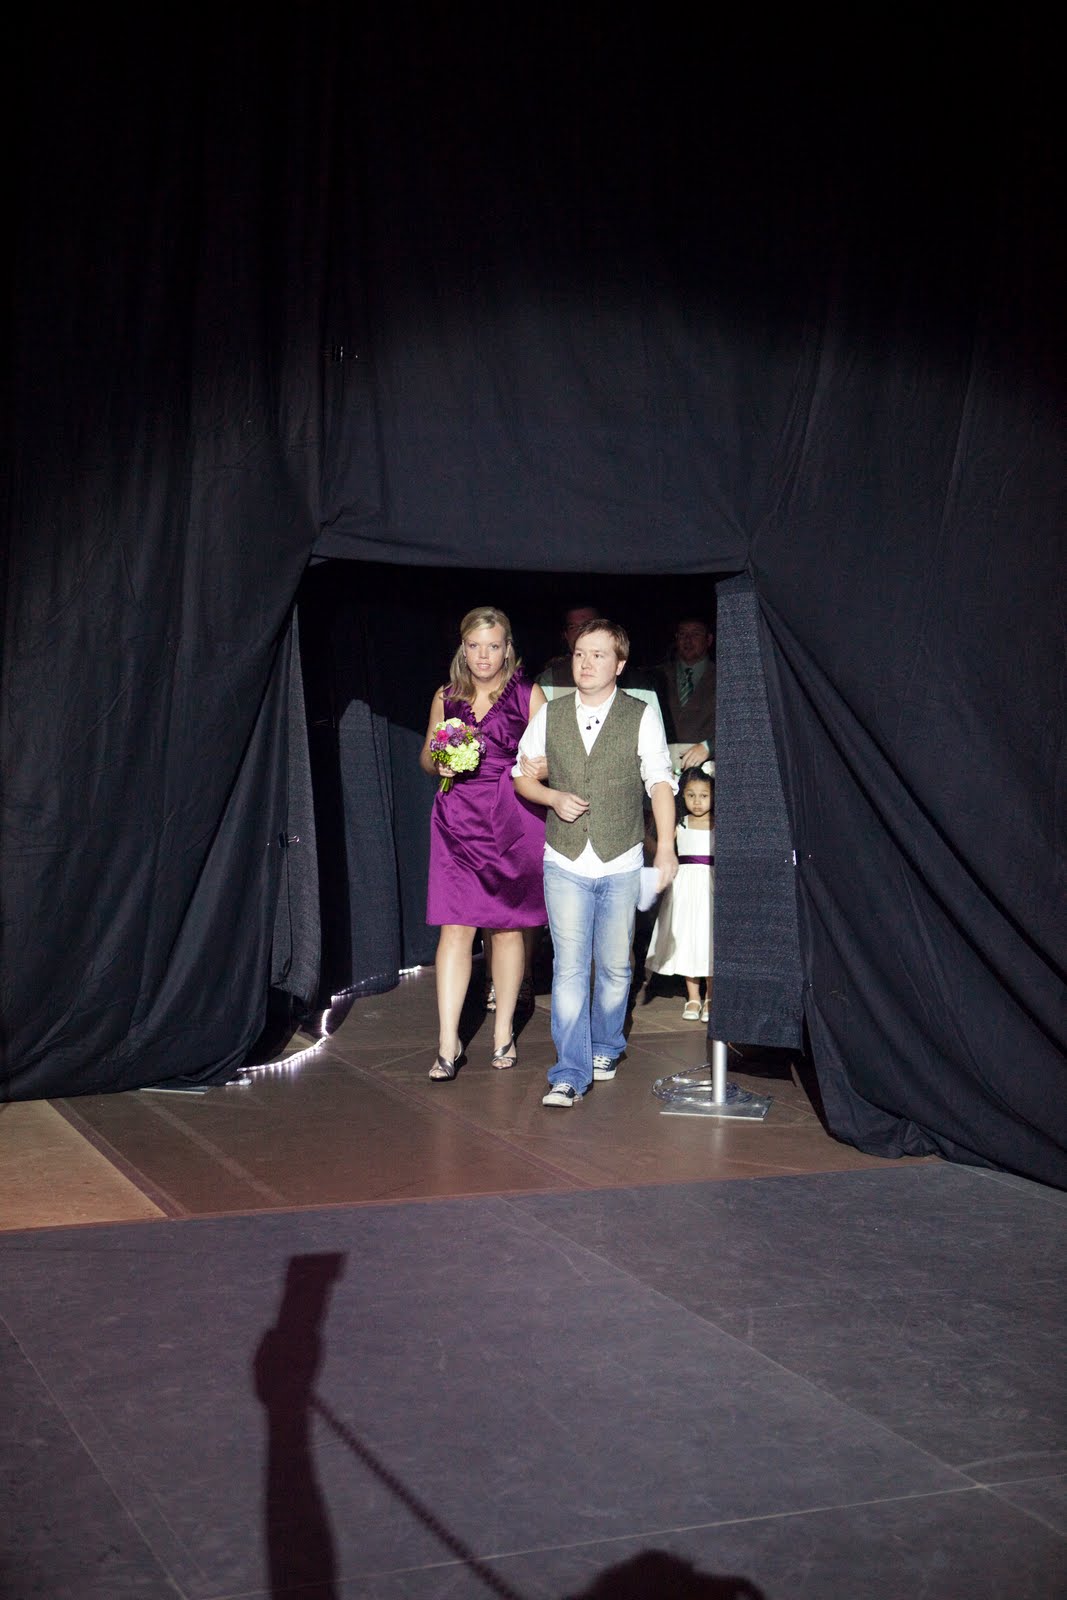
Last you heard from me, DG and I had recorded that fantastic little video of us just being…well, us.  Our guests all parked in the Garage at the Curb Event Center, and we led them to one particular door.  Here’s how the transformation of our entrance to the reception took place.


This is really the only shot I have of the space before it was ready to go.  It's nothing more than a back hallway of white concrete block, but thanks to my lovely MOH, a drop ceiling, and some trusty binder clips, we draped it in black fabric and added some lighting to transform it into this...


We used strips of wide ribbon and clothes pins to organize the escort cards on the wall on the right where these...


became this...


Finally, this welcome area led our guests into a fabric tunnel, lit up with rope lights, which took them into the main reception area.


And cue the spotlight.  Here we our making our grand entrance....to the Black Eyed Peas I Gotta Feeling.  Oh yes we did.  (The bridesmaids...and a little brother...insisted!)


Up next...how we built our reception venue from the ground up...quite literally.  Stay tuned!


Thanks to Will Knowles for these handsome photos.

...ceremony details: the flowers...

I have been hesitating to write about this for the last few days because I need to tread lightly as I tell this story.  As with every wedding, ours was not without its snafus.  The situation surrounding our floral needs definitely became one of them.  This is kind of what happened in a nutshell…

DG’s sister got married a little less than a year before we did.  Her wedding was gorgeous, to say the least.  Largely due to the efforts of a distant cousin who does event design and floral for a living (and beautifully, I might add).  He was willing to basically donate his time and my SIL covered his costs and purchased the flowers at wholesale.  This equation worked really well for her, so it made perfect sense for us to do the same. 

Well, somewhere between a naïvely planned floral budget, a couple of assumptions, and some severe miscommunication…that arrangement completely fell apart, and we learned that said cousin would not be coming….PRECISELY TWO WEEKS BEFORE OUR WEDDING.  I don’t want to speak badly about him because he is family and because if I had been much smarter….I could have prevented every ounce of heartache and panic we suffered when DG and I looked at each other like WHAT ARE WE GOING TO DO NOW?  In the end, everything worked out for the better.  We were able to spend less money and I could not have been happier about the way our flowers looked.

So the absolute hero in this story???  Our dear friend Troy.  Troy just so happened to arrange all the flowers for my MOH’s wedding back in October, and they were perfect.  He has a 9-5 just like everyone else, but he’ll do weddings here and there simply because he’s talented and he can.  So Troy had ZERO notice, but we called him up one night and said, “We need a florist.  We have $1,000.”  He was more than happy to jump in and take over.  I was blown away by how he pulled it all together.  I won’t spoil all the surprise of our details for the reception, but here’s what he did for our ceremony.

This display, welcoming our guests in the entryway, was a bit of a sneak peak of our reception decor.

Altar arrangements.


And a close up.


My bouquet.


He did a lovely job incorporating the picture of my grandma who passed away last Thanksgiving.


DG's boutonniere, #1.  Troy is so smart.  He always makes two boutonnieres for the groom, knowing that inevitably the first one will be crushed at some point by an unstoppable hugger.  DG's didn't even make it to the ceremony if I remember correctly.


More pretty bouquets for all my girls.


And here's a close up of the cute little carnation pomander Troy made for our flower girl.

Now, what have we learned?  If you are in the thick of planning and need a little guidance, learn from our mistakes and follow this advice…

1.       The first thing out of your mouth after, “Hello, my name is bride-to-be,” should be “We’re working with a budget of $X.XX, and this is what we need from that money.”  Whether you’ve gathered a group of friends to accomplish a certain task or a family member is handling a project or you’re working with a bonafide professional vendor.  DO. NOT. SKIP. THIS. STEP.  Maybe you’ll learn that you haven’t yet found the right person for the job, or maybe you’ll give that person an opportunity to find creative ways to cut extra cost.  Either way, you’ll be grateful you talked about it up front.  Like I said before, I could have prevented a lot of crying…
2.       Work with talented, creative people and set them free to create.  I know very little about flowers.  I just know what I think is pretty.  When it came to the actual design for our flowers, I gave Troy an idea of the overall aesthetic theme we were shooting for and a color palette and left the rest to him.  I understand that, to some brides, flowers are the one thing that has to be just so.  They weren’t a huge priority for me.  I didn’t have to have any one certain bloom.  I just wanted them to look nice and fit in with the other décor.  So when Troy came to me with suggestions, I said yes to every one and just let him do what he does.  That’s why we called him in the first place.  The result was SO MUCH BETTER than anything I could have dictated to him!

Finally, if you’re a bride looking for an affordable florist who is talented, oh-so-easy to work with, and is willing to work within ANY budget…please consider Troy.  He and his wife are great people and so much fun, and I promise, he’s fantastic.  In our case, he came in under our budget, even after he’d added fees for himself, but we decided to give him the full $1,000 anyway because we were so grateful and so impressed.  Troy isn’t exactly running a floral business, but he has given me permission to give out his email address to anyone who may be interested, so shoot me an email at enoughforeverafter(at)gmail.com if you want his contact info! 


As always, thanks to Will at Will Knowles Weddings for all these pretty pictures.

...ceremony details: custom built decor...

Though DG and I LOVED the look and feel of Edgefield Baptist Church in East Nashville, we had a few concerns about the space.   As you can see, there’s some really obvious gold lettering over the baptismal area.  We weren't really feelin' it, but we set out to find a solution.  The people at Edgefield were so so easy to work with, and I their wedding policies are some of the most reasonable I encountered.  That being said, they understandably have policies in place to protect the integrity of the building itself. 


We were not allowed to fix anything to the walls, no tacking things to pews, etc., so we did some brainstorming to come up with a solution.  We talked about renting columns of some kind, but we only found tacky white plastic columns or black wooden ones that were far too contemporary for our theme.  We talked about building some, but it seemed that was too big an undertaking.  Ultimately, we settled on a strategy that was two-fold.  First, we wanted to ensure our guests didn’t miss the meaning in all of the lyrics and scripture in our ceremony, so we had the friend who designed our website design content to project onto the screen.  This covered most of the lettering.  It was mostly just ambiant, abstract color and the text. Unfortunatly it wasn’t really captured in the photos, but it worked well and was both functional and aesthetically pleasing.


Our other objective was simply to give our guests a focal point.  Something nice to look at.  We discussed a variety of options, and finally settled on a cross.  After a series of drafts for this project, here’s what we did.  We bought a four by eight foot piece of plywood and some simple decorative molding.  My dad and I spent an evening sometime last March measuring and cutting the moldings to fit.  The following morning my mom and I stained it to match the woodwork in the church.  Once it was dry, Dad and I assembled the entire piece.  I wish I had pictures of the whole step by step, but of course, at the time, I was more concerned with completing the project than documenting it.  We purchased this wrought iron cross for something like $10 at Hobby Lobby and sprayed it gold then mounted it in the center.  Dad used fishing line to support it at the church, and when it was all put together, it provided the perfect backdrop for our ceremony.  All in all, we probably spent about $50 or $60 on the project.  By far one of our best decisions, in my opinion!  What do you think of our finished product??


Just goes to show you that a little ingenuity can go a really, really long way!  Have any of you other brides had friends or family custom build pieces for your wedding?

...DIY aisle runner...

DG and I have pretty much been managing our wedding like a corporation.  Everything is a branding opportunity, and we are a-ok with that.  To that end, we thought it'd be nice to incorporate our monogram into the ceremony.  The aisle runner seemed like a really appropriate place to do that, so we looked into having a custom runner made.  Sounded like a great idea until I realized that we'd spend anywhere from $100-$300 to do it.  No. Thank you. 

I thought about it for about 30 seconds before I decided I was fully capable of doing it myself!  It took a little time, but I think the money we saved was well worth it!  I purchased the runner itself online for about $20 and bought our four shades of acrylic paint from Michael's for $0.69 a piece.  I like $25 a lot better than $300...and I'm sure you do too.  So I thought I'd share.  Here's what we did...

Step 1:
I utilized DG's mad skills to project the image onto the runner, which we'd taped to the wall. We had access to a video projector, so that's how we chose to do it, but you could go old-school and do it with an overhead projector. You could also achieve the same result if you printed the image onto multiple sheets like a poster (I think you can do this in MS Publisher, maybe even in Word.) which you could trace. Most runners are pretty sheer, so as long as you fix your poster to whatever surface you're working on so it doesn't wiggle, you should be good to go.


Step 2:
I had a fine point Sharpie and traced away, hoping I was at least getting close.


Step 3:
We took a second to admire our handiwork.  I wasn't too concerned about the imperfections because I knew I could smooth it all out when I started painting.  Plus, it's on the floor at a distance.  It's not like our guests are going to be analyzing it in detail.

Step 4:
I spent somewhere between three and four hours watching TV and painting over the weekend (in my PJ's...what's weird?).  I was surprised that it went pretty much according to plan.


Step 5:
I laid it out and let it dry for the rest of the day before I rolled it back up to store until the wedding.


When it was all said and done, I was pretty pleased.  In case any of you are considering taking on this project, here are a couple of lessons learned:
  • I suspected that acrylic paint would work well, and it did, but you really do have to lay it on thick, and in some cases, two coats would probably be best.  If I'd had the energy, I'd probably have done two coats on the entire thing, but I just don't care that much.
  • The paint will definitely bleed through the fabric, so make sure you're working on a drop cloth or something.  I sort of anticipated that it would bleed, so I was prepared....but let me also add, if you do not move the runner while your paint is still wet, it will dry and adhere to whatever surface is underneath.  I did a major portion of the painting Friday night and was disappointed the next morning to discover that I had to peel the runner off of the sheet I'd been working on.  It's thin, so it tore in a couple of places, but I was able to patch it up with some packing tape from behind and an extra layer of paint on top.  It just would have worked out better if I'd have moved the runner to another position to let it dry completely.  Don't make the same mistake.
  • Finally, you'll see in the corner there where I dropped my paintbrush.  Do not drop your paintbrush.  I got lucky in that I dropped it close to the edge, where we'd already planned to crop the runner because the end was torn in shipping.  The moral of the story is, this is sort of a one chance kind of thing.  If I had really screwed it up, we would have had to chop it off and start again from step one, so be careful!

…reception-part three: the tables…


I keep thinking I'm going to be a good little blogger and blog some more….but I find myself spending my free time doing the most random of things. Scouring the internet for printing labels. Researching cardstock. Buying paint. You know…important things. I've been meaning to write more about our reception for quite some time, but I've been stalling because there are a handful of things I really need to take/find pictures of. However, in an effort to get at least one post in this week, we'll throw a little something together for now.
On to our reception… (If you'd like to catch up, parts one and two are here and here, respectively.)
So obviously, the tablescapes will make up much of the décor at our reception. We're starting with big long linear tables. (Lines make my heart so happy. J) You get the idea here in DG's rendering of the space. (Don't you love him?)

Next let's talk about linens. Or should I say lack thereof. It seems that renting linen is just one thing you can't easily get around. Because of the cleaning and all that's involved, it's pricey. We'd budgeted something like $400 for this purpose alone. I think that's a terribly large chunk of the $9,000 we're aspiring to overall. Seems foolish to spend almost 5% of the budget on glorified tablecloths. So, true to form, we're rebelling. One evening when we were sitting in the arena, dreaming up all these ideas, we got stumped by linens. Frustrated, DG looked at me and said, "You wanna just cover the tables in paper and pull out the crayons?" "Why, yes. Actually, I do," I said.

SO! Brown kraft paper will cover our tables. And thanks to Crayola, I was able to order a custom box of colors. I have four boxes of crayons at home full of a wide array of greens, purples, browns, and white. My mom tells me we need to learn to write our names upside-down, a la the wait staff at Macaroni Grill so that we can go around to each table and introduce ourselves. "Hi, I'm Racheal. I'll be your bride this evening." In keeping with the theme, our place cards and table numbers will be written/drawn in crayon. Just try not to be jealous.

We'll use a smaller 12" roll of white butcher paper down the center to serve as our runner and add a little contrast. And I'm pretty sure that will bring the grand total for "linen" to like $75. Yes, please. I've looked in a million places to find examples of where someone may have done this before, but to no avail. This was the best I could do, and I can't even remember where it came from. Lovely, no?


Finally, to tie into our lock and key theme, we're doing a sort of "vintage-metal-chic" kind of thing with the rest of the décor. We found these great little metal planters at Old Time Pottery for $3.00 each. We're painting them a dark metallic bronze. These will hold our flowers (which I have no idea about just yet, it's fine) and sit in the center of each table. I think they'll work well considering they're narrow enough to leave plenty of room for the place settings.


On each side of said centerpiece we'll display one of our smaller homemade tin can lanterns. (At some point when I can take some progressive pictures, there's a whole post coming on these.) Ours are way pretty and will be painted in the same bronze, but this at least gives you the idea.


That's all I've got for now. Details to come later. What do you think?
Related Posts with Thumbnails